
Microsoft · DesignOps
Evolving DesignOps with AI
From component cleanup to generating AI-ready Figma files.
Legacy Figma files can contain outdated components, fragmented libraries, inconsistent structure, or components broken down into individual layers. Cleaning up and reconstructing these files is slow and repetitive. I built a sequence of plugins and AI agents to improve design system compliance, modernize legacy files, and ultimately generate structured AI-ready Figma files from existing designs or screenshots.
The workflow accelerated design, enabled downstream AI workflows, and drove adoption of AI-ready Figma across the Security UX org and Autopatch PM team.
At a glance
- Role
- Designer, builder and DesignOps advocate
- Scope
- Three Figma plugins and one AI agent
- Focus
- Components, libraries, file structure and generation
- Type
- DesignOps · AI tooling · Design systems
Context
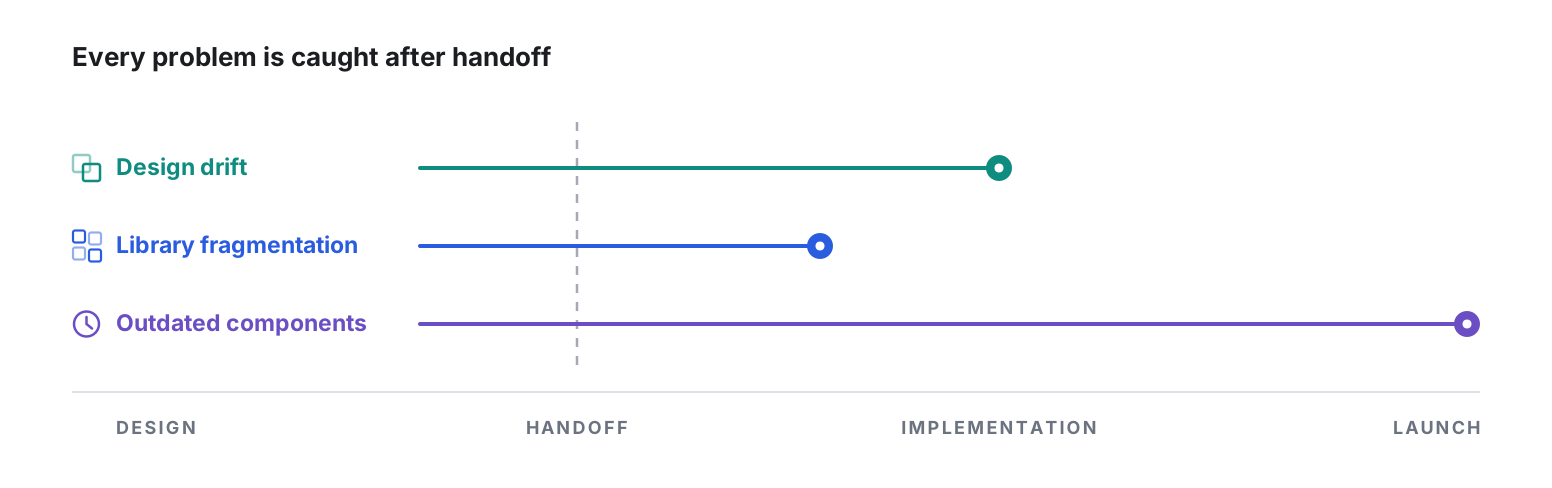
Figma files accumulate design debt over time as products evolve: outdated components, fragmented libraries, inconsistent structure, and components broken down into individual layers. I encountered these issues repeatedly while working across Microsoft Security, where designs often needed to align with multiple design systems and libraries.
As AI became part of the design workflow, the structure of the Figma file became increasingly important. A visually accurate design was not enough. For AI to interpret, generate, or work with a design downstream, the file needed meaningful components, variables, tokens, auto layout, and semantic naming.
Problem
Design debt made legacy Figma files harder to maintain and use with AI.
Cleaning up and reconstructing legacy files manually was slow and repetitive, while maintaining design system compliance across multiple libraries added another layer of complexity. The challenge was to make this work more systematic, then extend it beyond cleanup to generating structured, AI-ready Figma files.
Approach
Remediate → Understand → Rebuild → Generate
The workflow evolved from remediating individual components, to understanding multiple design systems, to rebuilding entire Figma files, and finally to generating structured, AI-ready Figma files from an existing file or screenshot.
| # | What I built | Form | Scope | Core idea |
|---|---|---|---|---|
| 1 |
SFE Adoption Assistant SFE: Security Fluent Extension |
Figma plugin | One baseline library | Automate detection and replacement of outdated components |
| 2 | Design System Calibrator | Figma plugin | Multi-library | Determine component ownership across multiple design systems |
| 3 | Intune Rebuild | Figma plugin | Whole file | Rebuild Figma files with consistent AI-ready structure, not just appearance |
| 4 | AI-Ready Figma | AI Agent | Legacy Figma or screenshot → new AI-ready Figma file | Create AI-ready Figma files from any visual input |
1. SFE Adoption Assistant (Figma plugin)
To help myself be more efficient in adopting the Security Fluent Extension (SFE) library in refactoring the legacy design, I built the SFE Adoption Assistant, a Figma plugin that:
- analyzes selected elements
- matches non-SFE components to SFE components
- lets the designer approve replacements
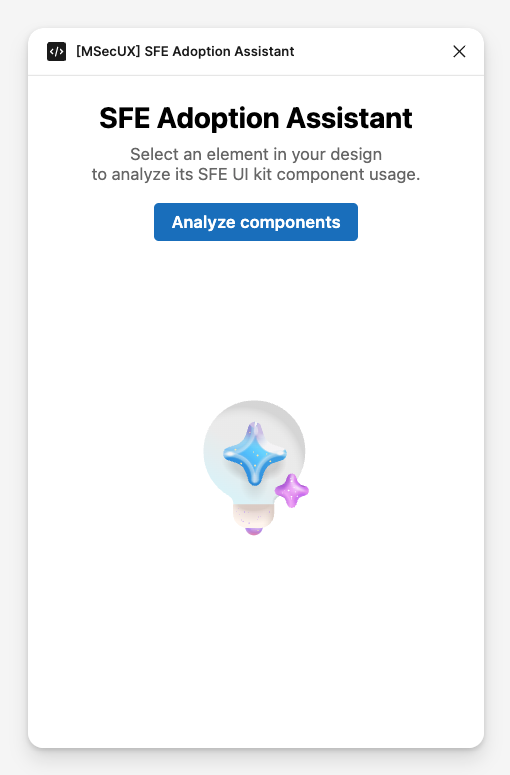 1. Start from the designer's selection
The scope stays visible and deliberate: select an element, then ask the plugin to inspect its component usage.
1. Start from the designer's selection
The scope stays visible and deliberate: select an element, then ask the plugin to inspect its component usage.
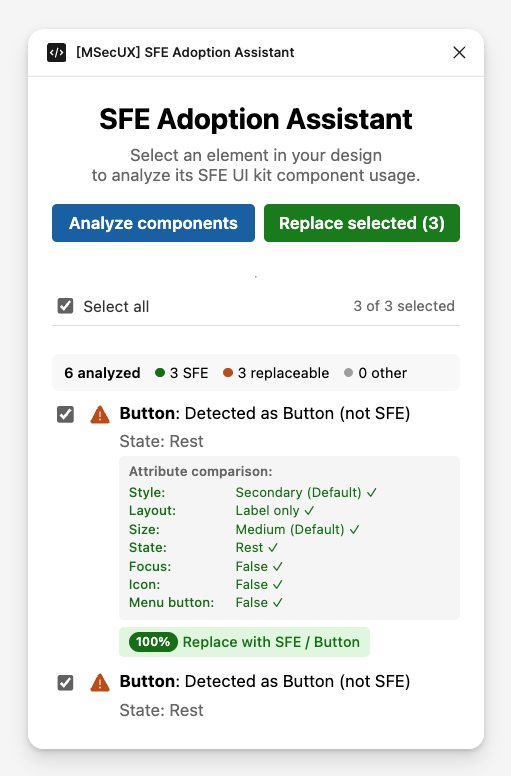 2. Compare before replacing
The plugin shows the proposed SFE component and the attributes used to match it.
2. Compare before replacing
The plugin shows the proposed SFE component and the attributes used to match it.
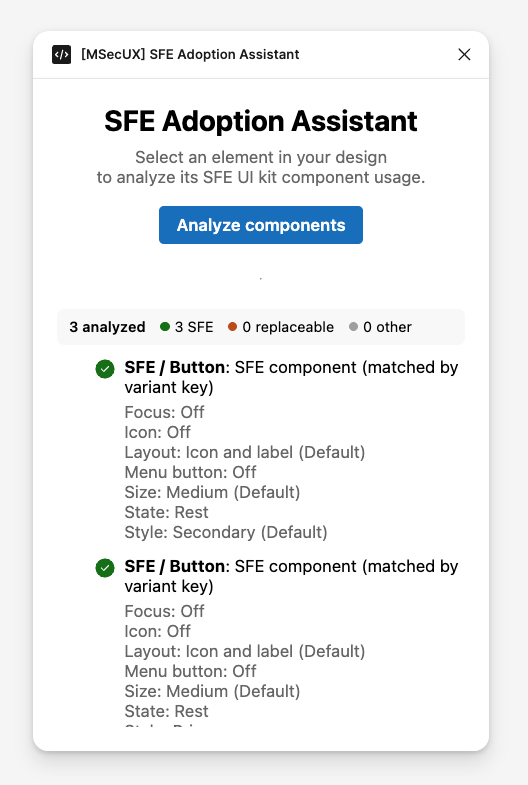 3. Verify the result, not just the action
A second scan confirms that all three buttons resolve to real SFE instances and no replaceable elements remain.
3. Verify the result, not just the action
A second scan confirms that all three buttons resolve to real SFE instances and no replaceable elements remain.
What I learned: matching against the SFE library was not enough. For the tool to be useful beyond my immediate team, it needed to scale to support any library.
2. Design System Calibrator (Figma plugin)
To scale the plugin to support multiple libraries, I expanded it around a configurable component registry, scaling it to handle multiple libraries. It evolved to a plugin that:
- compares instances with a selected baseline library
- separates baseline and non-baseline components
- shows which components have a replacement
- lets the designer preview, approve or undo a replacement
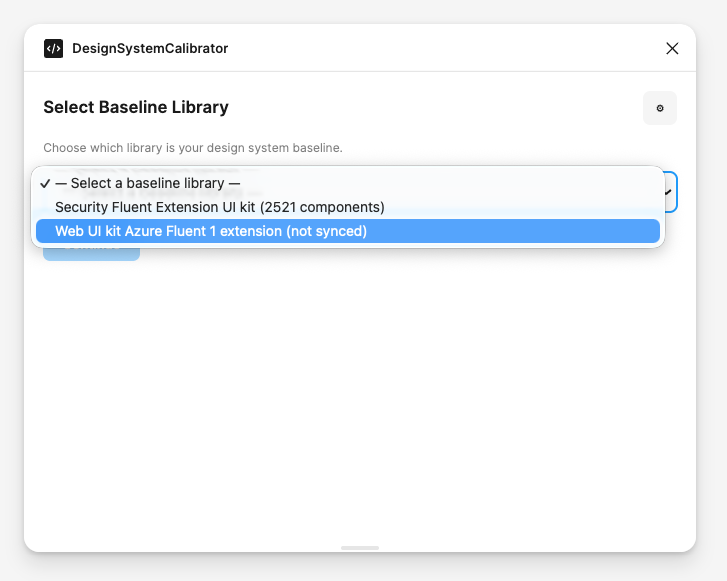 1. Choose the design system
The designer chooses one from the available libraries (can be customized) to define the baseline.
1. Choose the design system
The designer chooses one from the available libraries (can be customized) to define the baseline.
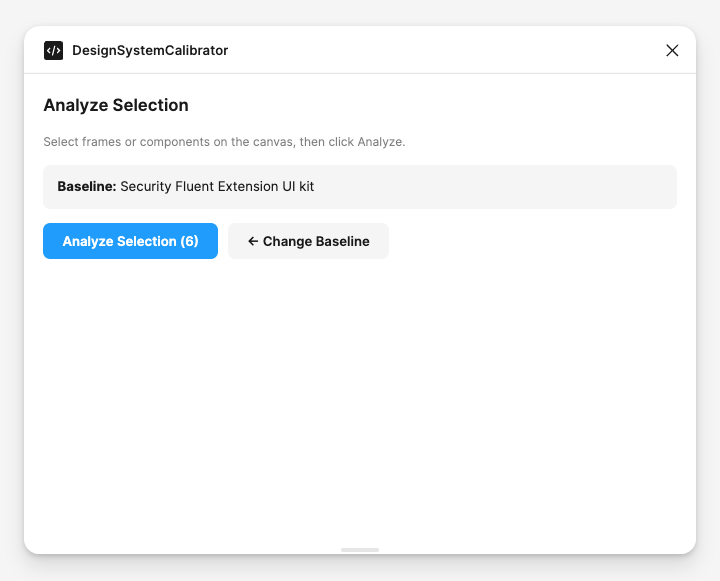 2. Select scope
The plugin keeps the baseline visible while the designer chooses what to inspect.
2. Select scope
The plugin keeps the baseline visible while the designer chooses what to inspect.
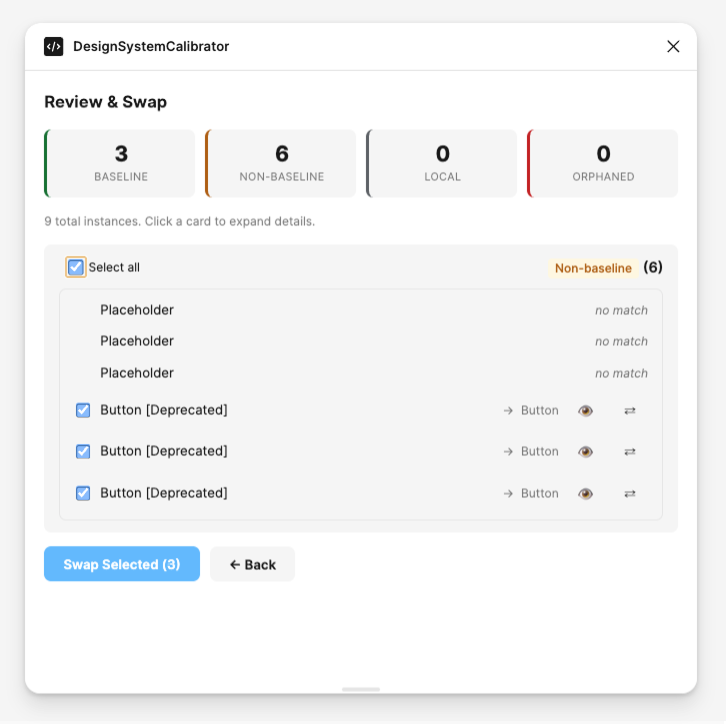 3. Review classified results
Baseline, non-baseline, local and orphaned instances stay separate before swapping.
3. Review classified results
Baseline, non-baseline, local and orphaned instances stay separate before swapping.
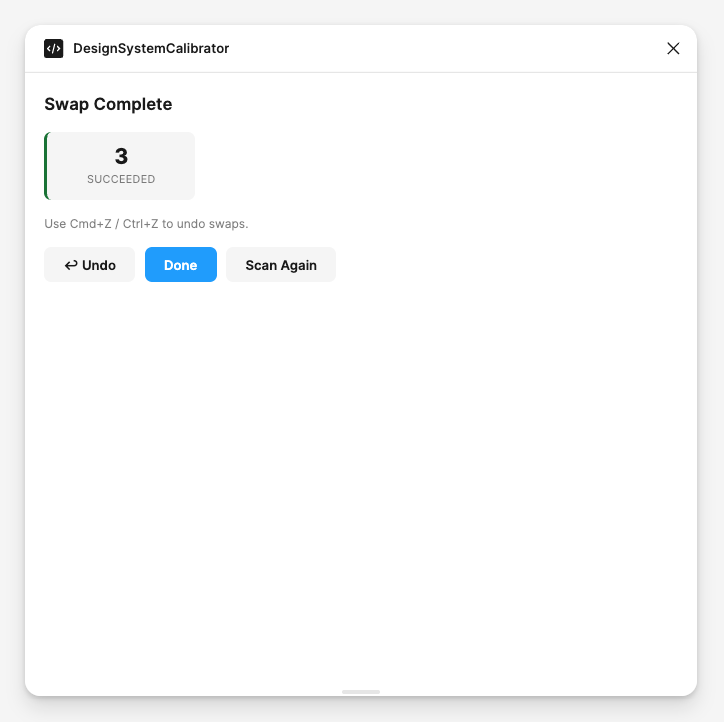 4. Report and undo changes
The final state reports successful swaps and keeps undo and rescan available.
4. Report and undo changes
The final state reports successful swaps and keeps undo and rescan available.
What I learned: one product file could simultaneously use components from multiple tiered libraries; and using the right components did not make the file structure right. So the next tool needed to understand which design system each component belonged to, and then rebuild the file with a consistent structure.
3. Intune Rebuild (Figma plugin)
After realizing that the file structure is as important (if not more so) as the components, I moved from component replacement to whole-file reconstruction. 90+% of my design work was in Microsoft Intune, so I built a plugin that:
- inspects file structure against defined rules
- assesses whether the file is fixable or needs a rebuild
- rebuilds the file with consistent structure, auto layout, variables, tokens and semantic naming
When rebuilding a file, the plugin selects components from the correct design systems following a tiered search order: it starts with Intune's recommended components and Intune UI Toolkit, then checks SFE, Security Data Visualization, Fluent 2 Web and Azure Fluent Extension library. A lower tier is used only when a higher tier does not provide the needed component.
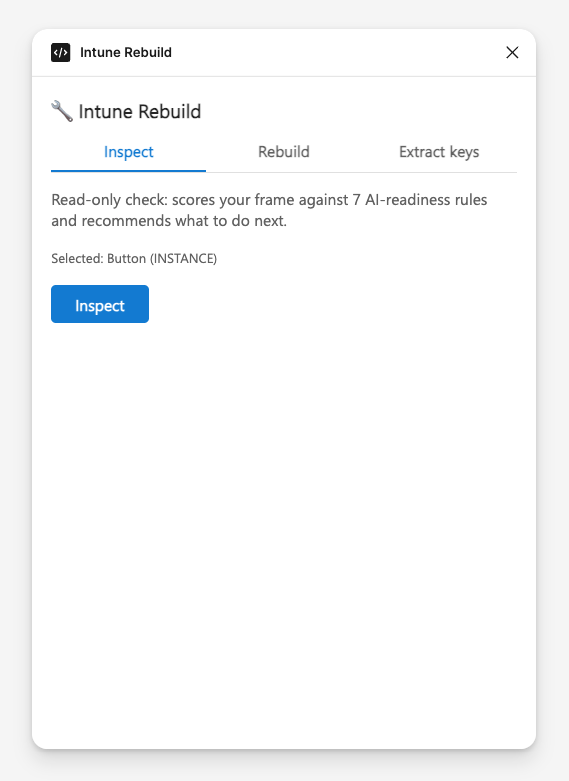 1. Select a frame
Inspection is read-only and evaluates the selection before rebuilding.
1. Select a frame
Inspection is read-only and evaluates the selection before rebuilding.
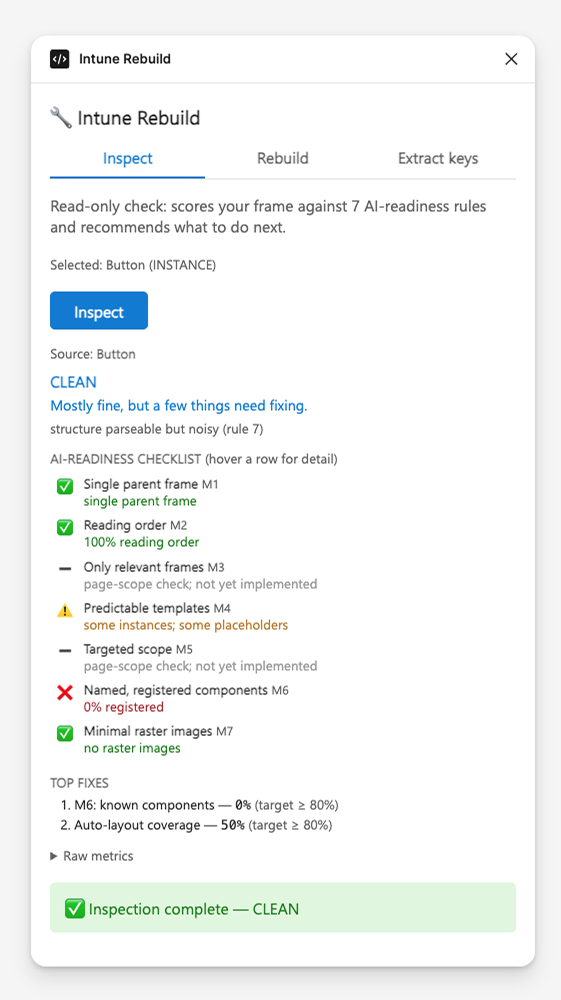 2. Review the inspection
One merged capture shows the verdict, all seven checks and the ranked fixes from the same scrollable screen.
2. Review the inspection
One merged capture shows the verdict, all seven checks and the ranked fixes from the same scrollable screen.
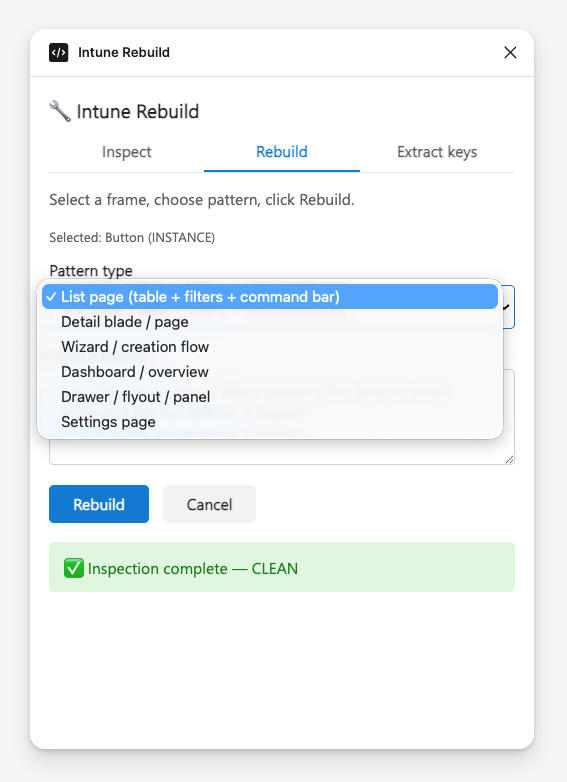 3. Choose pattern and rebuild
The designer selects the target page pattern and can add contextual hints.
3. Choose pattern and rebuild
The designer selects the target page pattern and can add contextual hints.
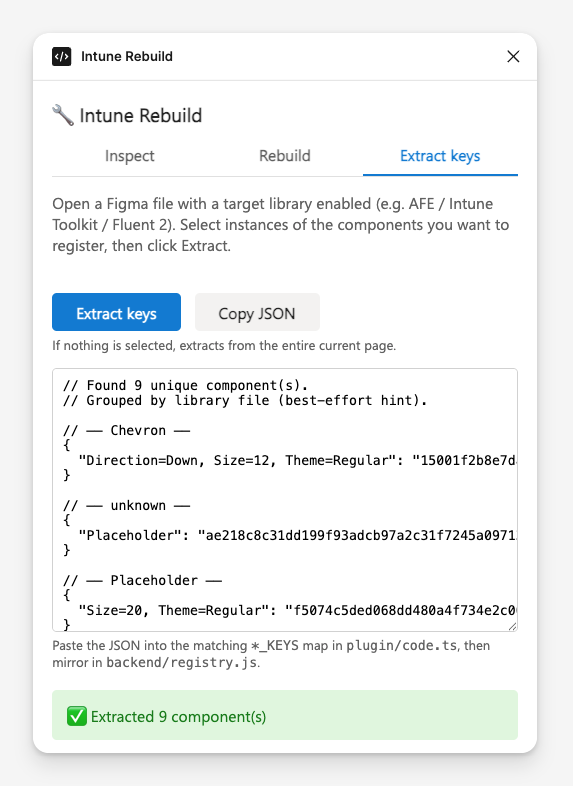 4. Register component keys (optional)
Registered keys connect rebuilt elements back to known library components.
4. Register component keys (optional)
Registered keys connect rebuilt elements back to known library components.
What I learned: rebuilding still depended on having a Figma source. Sometimes the available input was just a screenshot. The next tool needed to generate a new AI-native Figma file from either.
4. AI-Ready Figma (AI agent)
The Intune Rebuild solved the problem of inconsistent structure in existing Figma files. But often, all that's available is a screenshot, leaving designers to spend hours recreating the design from scratch in Figma.
To close this gap, I moved the workflow from a Figma plugin to an AI agent that:
- given an existing Figma file or a screenshot, the agent creates a new File file using auto layout and semantic naming
- uses components, variables, and tokens from the specified libraries
- carries forward the same tiered library order from Intune Rebuild
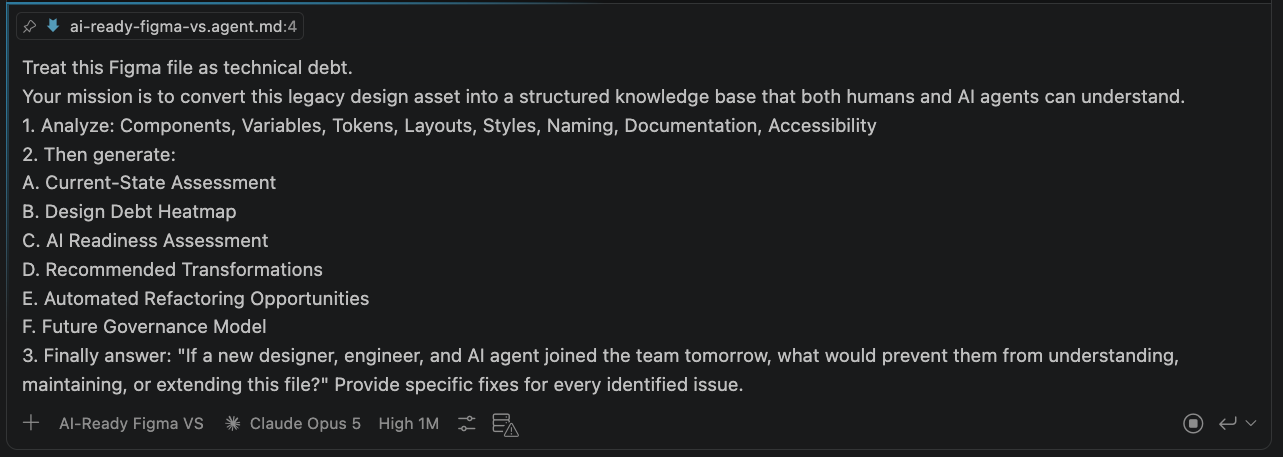
A. Creating from a legacy Figma file
When a Figma file exists, the prompt asks the agent to analyze its components, variables, tokens, layouts, styles and naming before identifying transformations and refactoring opportunities.
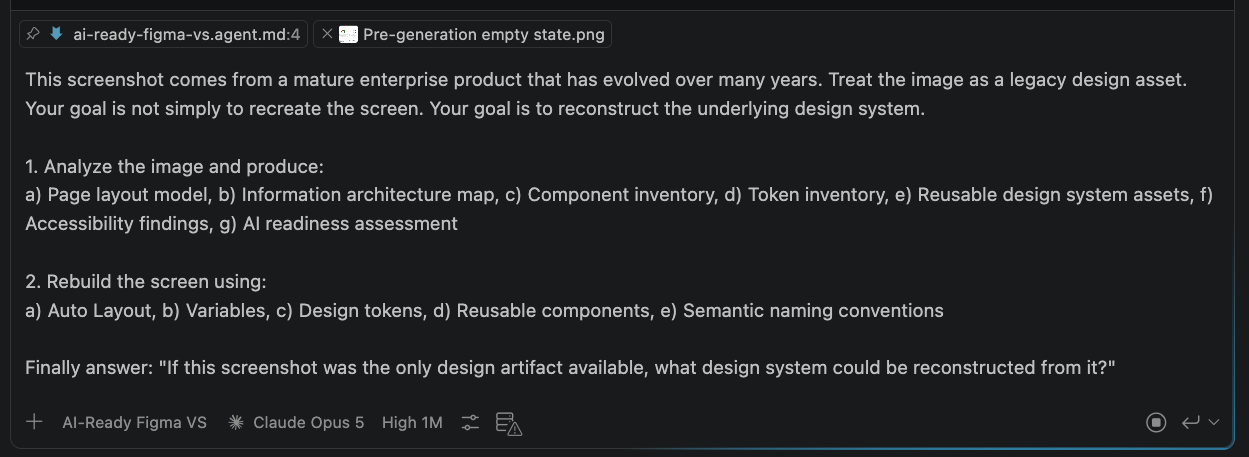
B. Creating from a screenshot
When no Figma source exists, the prompt asks the agent to infer the layout, information architecture, components and tokens from the image, then rebuild the screen with explicit structure.
## Component Search Order

Step 0: Follow the Intune Component List […]
Step 1: Search Intune UI Toolkit […]
Step 2: Search SFE […]
Step 3: Search Security Data Viz UI kit […]
Step 4: Search Fluent 2 Web UI Kit […]
Step 5: Azure Fluent Extension Icons […]
Step 6: If no component is found […] report the gap and build with
primitives + tokens from the highest-priority library.
## Core Principles

1. Library only. Before creating any frame, text, or shape, call `search_design_system` (or `get_libraries` to confirm what's
subscribed) for an existing component. If a component (or component set) exists, instantiate it via `use_figma` using its component key - never hand-build a lookalike.

2. Tokens always. Colors, type, spacing, radii must come from library variables/styles. Resolve token names via `get_variable_defs`. If a token isn't found, surface that gap rather than hardcoding hex/px silently.

[…]

7. Preserve component provenance. Note which library/key/variant a result came from, and warn the user when detachment severs the link to library updates.

8. No invented data. Headers, rows, labels come from the user's source (screenshot, code, extraction). If data is missing, leave the library's placeholder text and flag the gap - never paper over with sample literals.
What I learned: the quality rules developed across the earlier plugins could become generation instructions. Instead of correcting a file after it was built, the AI agent could create the new file with those rules from the start, preventing design debt from accumulating.
Outcome
- Accelerated design by turning repetitive Figma cleanup and reconstruction into an AI-assisted workflow.
- Improved design system compliance by using components, variables, tokens and tiered library rules throughout the workflow.
- Modernized legacy files by inspecting and rebuilding existing Figma files with consistent structure, auto layout and semantic naming.
- Enabled downstream AI workflows by creating structured, AI-ready Figma files that could be interpreted by AI for working prototypes and reusable code.
- Drove adoption across the organization by sharing and enabling the AI-ready Figma workflow across the Security UX org and Autopatch PM team.